Exercise 2 Demo: Part D : CSS Styles
This is the HTML you will need for Part D of Exercise 2.
Styles - the Beginnings of CSS or Cascading Style Sheets
We use styles to tell the browsers how to format the look of our page.
Styles are made up of two parts: The web page element or tag that the browser is going to format (the selector) and the formatting instructions (the declaration block). In the example below we are going to format our p tags or paragraphs - making the text in them blue and 12 pixels in size. We would place these directions in the head of our document.
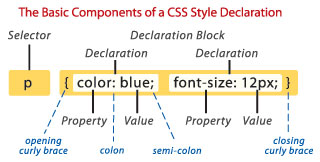 |
CSS Styles are formatted slightly differently than HTML tags. They use the colon, semi colon, and curly braces. |
Start your document the usual way.
<!DOCTYPE html> Try Some Styles
<html>
<head>
<title> </title>
Then add the opening style tag with the attribute that tells the browser to expect some CSS.
<style type="text/css">
Now we can add a selector and give it a declaration that tells the browser how we want it to look. We will start by giving our body some style. We will use body as our selector and then use an opening curly brace { which can be found next to the p key on your keyboard.
We will define a background color, a few font families and a font color. And then use the closing curly brace.
body {
background-color: #BDD2AC;
font-family: Tahoma, Helvetica, Arial, sans-serif;
color: #5C2A2C;
}
As you can see there is a colon in between the property and the value. Plus after each declaration I put the semi-colon to tell the browser that item is complete. When I finish defining the style for my body I add the closing curly brace }
I like to write each declaration in its own row so it is easier to see.
I will add another style item - this time I will style my h1 or Heading 1 - then close out my style tag and my head tag, add text to my body and then see how my page looks.
h1 {font-size: 30px;
color: #34541A;
}
</style>

</head>


<body>
This is what our heading or h1 tag would look like.
Trying some styles on our Headings
Put some text in here and see how it looks.
Look at it in the browser. Then try adding different colors or changing fonts or sizes or styling other heading sizes. Use your imagination. Have fun.
See the page created from our styles.
Be sure to close out your body tag and your html tag at the bottom of your document.
</body>

</html>
For more CSS... Go to Part E of Demo 2 to learn about Inline Styles.
Go back to the Definition Lists in Part C of Demo 2.
Want a review of Ordered Lists? Go to Part B of Demo 2.
Or a review of Unordered Lists? Go to Part A of Demo 2.
Go to the Exercise 2 page.
© Claudia Faulk. Updated 8.17